Showing posts with label healthy. Show all posts

Monday, October 6, 2014

Paleo Vegan Pumpkin Pie Balls

After a long hiatus...I'm back!  I apologize for falling off the radar, but the last several months have been jam packed, and I've forgone trying many new recipes - sticking, instead, to my "old faithfuls" for the sake of convenience.

Alas, I've been really missing experimenting in the kitchen and sharing new, yummy recipes with you guys as of late! Fall is my favorite time of the year for many reasons (amazing weather, comfy layers, holidays & family time...just to name a few), but one HUGE reason is the "flavors" of fall.  And it probably won't surprise you that, of those flavors, pumpkin is way up there on my list of favorites. In the last couple weeks alone, I've made pumpkin muffins, pumpkin pancakes, and, of course, these Pumpkin Pie Balls (twice!).

These little guys are just delightful...the perfect little pumpkin pie flavored, cakey bite. AND they're easy! You could definitely have them as a sweet addition to your breakfast, or like my husband and I have been doing, enjoy them as a treat after dinner :)  I made another batch for us again yesterday, and this time I added chocolate chips to the mix...because everything's better with chocolate, no?!


Paleo Vegan Pumpkin Pie Balls
Recipe yields 18-20 


Ingredients:

2 cups Almond Flour
1/2 cup Coconut Flour
2 Tbsp Tapioca Flour
1 cup Pumpkin Puree
2/3 cup Maple Syrup
1 Tbsp Coconut Oil
1 tsp Cinnamon
1/2 tsp Nutmeg
1/4 tsp Clove
1/2 tsp Baking Soda
1/2 tsp Salt
1 Tbsp Vanilla Extract
Optional: 1/4 cup Chocolate Chips

Directions:

1) Preheat oven to 325 degrees.
2) Combine dry ingredients, making sure to work out any lumps in the flours.
3) Add wet ingredients and mix into a sticky dough.
4) Form into 1 1/2 inch balls and place on lined cookie sheet.
5) Bake for about 20 minutes.
6) Serve plain or drizzled with additional maple syrup.

Wednesday, February 26, 2014

Paleo Dark Chocolate Bark with Pistachio and Cranberry

Confession:  I LOVE sweets. LOVE.

Sweet tooth?  No, this chick's got a whole mouth full of sweet teeth.

I'm also a firm believer that every day should end with dessert, and I'm not really willing to budge on that.  Life is just too short to not enjoy something sweet after supper...it's one of those little, simple pleasures that brings me a lot of joy.

However, I recognize, of course, that having a full-on dessert splurge every night is a bad idea for many reasons, so I find ways to get my sweets fix without undoing all the hard work I put in at the gym every week.  It can be done!  Moderation is key!

This Dark Chocolate Bark with Pistachios and Cranberries is a great example of a way to do dessert without over-doing dessert.  Dark chocolate is a superfood that boosts your mood and is rich in antioxidants and anti-inflammatories.  It's also good for your heart, brain, and skin!  Unfortunately, this doesn't mean you should eat a whole bunch of it every day, but it does mean that the occasional controlled portion can (and should!) be savored :)  Again... moderation!

I'm pretty crazy about the way the cranberries in this recipe cut some of the bitterness of the dark chocolate - perfect harmony!  Add pistachios for a little crunch and salt-factor...and wow, this bark is pretty spectacular.  Good luck trying not to eat it all in one sitting!


Paleo Dark Chocolate Bark with Pistachio and Cranberry

Recipe adapted from brighteyedbaker.com

Ingredients:

1 1/3 cups dark chocolate chips (at least 70%)
1/4 cup chopped pistachios
1/4 cup chopped dried cranberries

Directions:

1) Prepare a baking pan by spraying with non-stick spray and lining with parchment paper.

2) Melt chocolate chips in a double-boiler on medium-high heat, 
stirring until chocolate is completely melted.  
(Although I don't typically trust it, you can also melt your chocolate in the microwave, if need be. 
Start with 1 minute on high, then microwave for additional 30-second increments until melted.)

3) Pour melted chocolate into pan and spread the chocolate out evenly using the back of your spoon. Sprinkle on chopped pistachios and dried cranberries.

4) Place in fridge to harden for at least 30 minutes.  Remove from fridge, peel bark off parchment paper, and break into pieces.


Tuesday, February 18, 2014

Paleo Banana Chocolate Chip Muffins

We survived Snowpocalypse!  This week we're thawing out with some pretty sunshine and much warmer temps... it's 72 degrees outside at the moment.  Thank you, Lord.  I'm so ready for spring!

The recipe I'm sharing today is one of my go-tos and has been for quite some time now. Breakfast is my favorite meal of the day, and I especially love a sweet breakfast - pancakes, waffles, muffins, french toast, banana bread...you get the idea.  These muffins satisfy me just like the real thing, but they're a whole lot better for me than the real thing. It's a win-win!

Still not sold?...

You only need 7 ingredients to make them.  Yep, 7. So easy.

These are best enjoyed with a cup of coffee and after being warmed in the microwave for about 20 seconds :)


Paleo Banana Chocolate Chip Muffins


Ingredients:

3 bananas, ripe
3 eggs
3 1/2 cups almond flour
1/4 cup of dark chocolate (or semi-sweet chocolate) chips
1/4 tsp sea salt
1/2 tsp baking soda
1/4 cup coconut oil, melted

Directions:

1) Blend the wet ingredients.
2) Mix the dry in a bowl with a fork.
3) Combine the wet and dry, then scoop into a lined muffin pan and bake at 350 for 23-24 minutes (until lightly browned).
4) Remove and let cool.

There might be something wrong with you if you don't love these muffins ;)

Thursday, February 13, 2014

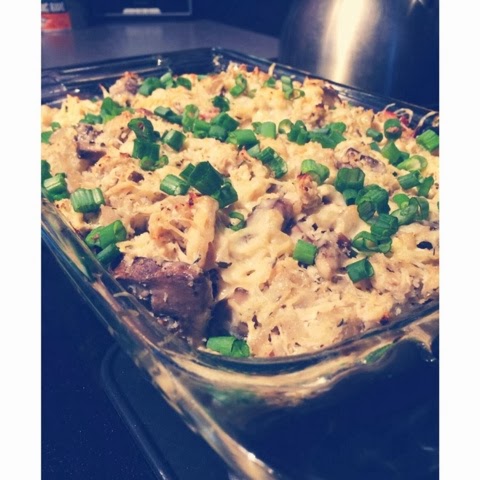
Cheesy Chicken and "Rice" Bake

Day #2 of SNOWPOCALYPSE in Athens, Georgia. I have not left my couch much at all in the last 48 hours other than to use the bathroom or retrieve food.  So far, the forced relaxation has been really kinda nice, but I think if I don't get out of the house for at least a little bit today, I'm going to start to go stir crazy!  I'm far too Type A to embrace doing "nothing" for very long (which can be both a good and bad character trait, I suppose).

I'm definitely going to miss working out with my fellow Tribe trainers this afternoon, so I've decided to kick off my morning with some Tabata intervals in the living room.  But first!...a cozy, cheesy, cauliflower-y recipe for you.  THIS is the kind of dinner I could easily finish off in one-sitting, by myself, on a bitterly cold night like the ones we've had lately.  Dairy is a Paleo no-go, but we still indulge on occasion. Let's be honest, folks, what is life without cheese?!? This recipe's got it (and needs it, if you ask me), but only enough for some extra flavor...not enough to have to call it a cheat meal :)

Did I mention I love cheese?  

If you haven't tried Cauliflower "Rice" yet, get ready to fall in love. It's a phenomenal Paleo substitute that we use all.the.time. You'll need a head of cauliflower and either a food processor or cheese grater. Cut the cauliflower into florets, place in the food processor, and pulse in one-second pulses until the size of rice. Voila! 

The hubby and I paired this with a side of sautéed green beans. Enjoy! 


                            Cheesy Chicken and "Rice" Bake 


Ingredients:

4 pieces of bacon, chopped
1 large yellow onion, chopped
12 oz button mushrooms, chopped
1 tsp french thyme
1 1/2 tsp salt
1 large head cauliflower, "riced"
1 1/2 lbs cooked chicken, shredded
1 cup sharp cheddar cheese
4 green onions, chopped


Directions:
1) Preheat oven to 375 degrees.
2) Place bacon in a large skillet over medium heat.  Cook until crispy.  
3) Using a slotted spoon, remove bacon from pan leaving bacon drippings.
4) Add onion and mushrooms to bacon drippings and cook about 10 minutes, stirring frequently.
5) Add french thyme and salt and stir until fragrant.
6) Add cauliflower and cook for 5 minutes, stirring occasionally.
7) Add chicken and bacon and stir until well combined.  Season with salt, to taste.
8) Pour mixture into 11x7" oiled (I used coconut oil) dish, sprinkle with cheese, and bake for 20 minutes or until top is golden brown.  
9) Sprinkle with green onions.


Friday, February 7, 2014

Pulled Pork Stuffed Sweet Potatoes and Paleo Broccoli "Cole Slaw"

Just in time for your weekend...two new awesome recipes that'll make for a mouthwatering dinner! 

This was my first experience stuffing a sweet potato with pulled pork (why did I wait so long?!?), and oh my, it was love at first bite.  This has already become one of my new favorite dinner options.  The combination of the sweet potato with the pork is divine, and the broccoli slaw adds a much needed crunch and acidity, as well as some pretty color to the plate!  Just trust me.  You need to try this.  

There are many amazing ways to prepare pulled pork, but if you're like me and need quick and easy fix some times, you're in luck!  This pork is made in the crock pot!  Drop all your ingredients in before leaving for work, and 8 hours later, you've got enough pork to last for several meals (leftovers rock!).  Go ahead and bake several sweet potatoes ahead of time, too - that way you'll just need to re-heat them when it's time to eat!  


Crockpot Pulled Pork

Ingredients:

1 onion, sliced thickly
2 lbs. pork shoulder
A few shakes of sea salt
A few shakes of chili powder
A few shakes of cumin
A few shakes of black pepper
A few shakes of cinnamon
A few shakes of red chili flakes

Directions:

1. Cut your onion into thick slices and place them on the bottom of your crock pot.
2. Put the pork on top and sprinkle all of the spices on top.
3. Turn crock pot on low and cook for 8 hours.


Paleo Broccoli "Cole Slaw"

Ingredients:

1 package of broccoli slaw
1/2 red onion, sliced
1/3 cup fresh squeezed lime juice
3 tbsp extra virgin olive oil
2 tbsp balsamic vinegar
3/4 tsp salt
1/4 tsp black pepper
1/4 tsp caraway seeds 

Directions:

1. Combine all ingredients in a large mixing bowl and mix well, ensuring an even coating of all ingredients.


Enjoy and have a lovely weekend! :)
Allie

Wednesday, February 5, 2014

Paleo Zucchini Hummus

Thank you all SO MUCH for the overwhelmingly positive feedback about my starting this blog!  I'm excited to have this space to share with you and hope that you'll each find some recipes you love as well as helpful tips about eating well and taking care of and loving your body.  

Please feel free to share my blog and recipes with your family, friends, co-workers, etc. on Facebook and elsewhere.  I've got one more recipe (after today's) to share with you this week, and I'm already brainstorming some of the new things I'll be trying this weekend to share with you next week! 


One snack I've really missed since switching to Paleo is hummus.  Traditional hummus is made from chickpeas, but because chickpeas are legumes, they aren't part of a Paleo diet.  
You can read more on this here: http://www.livingpaleo.com/foods-to-avoid-on-the-paleo-diet/ .  

I lovelovelove veggies dipped in hummus as a healthy snack alternative, so when I saw this Paleo alternative that uses zucchini instead of chickpeas, I had to give it a try.  I was skeptical, but truthfully, this tastes just like the real thing!  Needless to say, I am pumped about this find and will probably be making this pretty regularly.


Paleo Zucchini Hummus


Ingredients: 

1 medium zucchini, peeled and chopped
1/4 cup fresh squeezed lemon juice
1/4 cup tahini 
1 tbsp extra virgin olive oil
1 tsp cumin
1/2 tsp sea salt
1/4 tsp fresh ground black pepper
2 cloves garlic, chopped
Dash paprika (for garnish)

Directions:

1. Place the lemon juice and tahini in a food processor and blend until well combined and creamy. 
2. Add the zucchini, olive oil, cumin, sea salt, black pepper, and garlic and blend until smooth.  You may need to scrape the sides down a couple times.  
3. Transfer the hummus to a bowl and refrigerate for at least 30 min. before eating.
4. Serve with a couple dashes of paprika for garnish.


I made this on Sunday, and the hubby and I are still enjoying it.  It does get a little watery after a couple days in the fridge, but a quick stir gets the texture right back where you want it.  Enjoy!